Cauliflower & Kohlrabi
Brassica oleracea, Botrytis Group
The word cauliflower is from the Latin caulis (cabbage) and flōs (flower).

Introduction
Cauliflowers are clusters of buds of cabbage flowers, selectively bred to grow into firm curds before the full flowering stage. The word cauliflower is from the Latin caulis (cabbage) and flōs (flower).
They were first written about in Roman times and then were much grown in mediaeval Cyprus. During the 16th century, there are first mentions of Romanesco broccoli, which is actually a cauliflower. They are pale green, while recent breeding has given us cauliflower curds of varied colour.
Cauliflowers are mostly annual, but not exclusively. I have grouped them in this lesson with family relation kohlrabi, because both of these vegetables have a similar time pattern of growth, just for a totally different result!
Cauliflowers (and kohlrabi) grow extremely well in no dig soil, as the gardeners and presenters discovered in 2016–18 at the BBC Beechgrove Gardens in Scotland. They ran a trial of vegetables in dig and no dig beds, and started off feeling sceptical. Soon they were, and continue to be, enthusiastic for no dig, as you can imagine from the photo below comparing cauliflowers – dig on the left and no dig on right.


Harvest period
- Days from seed to first harvest: 100–150 for annuals, 270 for biennials.

- Best climate is moist, not dry, temperate without extreme heat.
Why grow them
There is something special about seeing the emergence of a small cauliflower in the middle of a huge mass of leaves. Then to watch it turn into a beautiful and tasty harvest.
Cauliflower plants are demanding for the results we desire, and need fertile soil plus temperate weather. They pose a challenge, but it’s worth the attempt for harvests of great flavour, colour and beauty.
- Each variety needs sowing at its best times.
- They need fertile soil.
- They are vulnerable to insects.
When you succeed, you know you are a good gardener.
Suitable for containers/shade?
You can grow cauliflower in shade, but I do not recommend growing them in containers because of their size. The harvest of food, per square metre and time needed, is relatively low, and I see them as a luxury. You may disagree!
Varieties
The nomenclature varies and can be confusing. Sometimes one sees the phrase ‘Italian cauliflowers’, which include Romanesco and all kinds of different coloured cauliflowers. In this lesson, my main differentiation is between annual and biennial types of cauliflower.
There are four common colours: white, purple, orange-yellow and green.


Annual
Read the small print for each variety to check the maturity time, because they all take a slightly different amount of time from seed to harvest. Many good varieties are hybrids now.
You have exotic colour choices, all of which are hybrids. Graffiti is best for a fast-maturing purple cauliflower. Its colour is from anthocyanin and survives boiling in water, unlike purple broccoli which turns green when boiled.
For green curds try Trevi, and for orange I like Sunset. The orange colour comes from beta carotene or vitamin A.
The old open-pollinated variety All Year Round can be sown from February onwards and is reliable, if not remarkable.
Clapton F1 is white and claims resistance to clubroot.
For Romanesco, I have found recently that the old open-pollinated varieties are giving smaller heads. I recommend hybrids such as Celio and Navona.


Biennial
Walcheren, Aalsmeer and Medallion F1 are examples of the many varieties you can grow to overwinter, from sowings in late June to early July. In seasonal terms that means sow before midsummer, for harvest in early to mid-spring.
Maybach F1 can be sown in October/early to mid-autumn, to overwinter as a small plant in a pot in the greenhouse, and then transplant in March for cropping in May.
Purple Cape F1 is both beautiful and productive, and is also hardy in temperatures as low as -15 °C/5 °F, before the curding stage in early spring,


Video
Purple cauliflower, at 65 days from transplanting
Sow and propagate
You need only a few cauliflower plants, therefore indoor propagation is totally worthwhile. Sow sparingly and resist the temptation to plant out too many of the same variety at one time, because you are then likely to have a glut. Cauliflowers from any one sowing will mature at a similar time.
- Seeds germinate quickly, but often unevenly – first leaves appear in four to six days.
Sowing conditions
As for cabbage, in temperatures as low as 10 °C /50 °F. However, you see better results when it’s 15 °C/60 °F or higher. Early sowings can be germinated on a windowsill.

Sowing time
See the table above.
Do check the seed packet suggestions, because each variety matures best at a different time of year, from sowing at a particular time. First sowings are from mid-February under cover, and last sowings can be October under cover. There is a mass of possibilities.
- For cauliflower harvests in autumn, the last sowing date in temperate climates is late June.
- Sowings in and after July need to be biennials, giving time for them to grow into medium-sized plants before winter, for eventual harvest in spring.
Sowing method
You want one plant per module, so either sow in a tray to prick out, or sow two seeds per module and thin to one. For hybrids’ expensive seed, I advise to sow in a tray, then prick out.
After a week or so, prick seedlings into modules of 3–5 cm/1.2–2 in width. They need full light, otherwise stems grow long and thin (‘leggy’). Early sowings can grow in an unheated greenhouse because seedlings tolerate some frost.


Pot on?
You have options. Either transplant at four weeks from sowing, or pot four-week-old seedlings into a 7 cm/3 in pot. From a very early sowing, potting on may gain an earlier harvest, plus it buys time if the planting bed still has a different vegetable, so is not ready yet for transplants.
Transplant
Grow in a slug-free bed, with compost the only mulch. Set plants deep in the ground so that all or most of the stem is below surface level. Water in, and make sure the module or pot stays moist for the first week.
Transplant size
As for many brassicas, a plant height of 10–18 cm/4–9 in is good, according to conditions and when the ground is ready.


Transplant time
From mid-spring to late summer, according to the variety sown, and when.
Spacing
Space at 45–60 cm/18–24 in, depending on how large you want your plants to grow. This means that beds can easily be filled with only a few plants, not always a desirable thing if space is short.
You can reduce the need for space by making just the two sowings I recommend: (1) late winter to early spring, and (2) midsummer.
- Cauliflowers’ need for space is mitigated both by their speed of growth, and how they can overwinter. There is time after clearing plants from sowing (1) to grow a lot of other vegetables, and you can plant biennial cauliflowers from sowing (2) after significant early harvests.
- Each harvest requires less growing time and fits nicely with other sowings. A contrast is courgettes/zucchini, whose growth period is longer and spans both the main spring planting and summer planting times.


Grow in a slug-free bed, with compost the only mulch. Set plants deep in the ground so that all or most of the stem is below surface level. Water in, and make sure the module or pot stays moist for the first week.
Transplant size
As for many brassicas, a plant height of 10–18 cm/4–9 in is good, according to conditions and when the ground is ready.
Transplant time
From mid-spring to late summer, according to the variety sown, and when.
Spacing
Space at 45–60 cm/18–24 in, depending on how large you want your plants to grow. This means that beds can easily be filled with only a few plants, not always a desirable thing if space is short.
You can reduce the need for space by making just the two sowings I recommend: (1) late winter to early spring, and (2) midsummer.
- Cauliflowers’ need for space is mitigated both by their speed of growth, and how they can overwinter. There is time after clearing plants from sowing (1) to grow a lot of other vegetables, and you can plant biennial cauliflowers from sowing (2) after significant early harvests.
- Each harvest requires less growing time and fits nicely with other sowings. A contrast is courgettes/zucchini, whose growth period is longer and spans both the main spring planting and summer planting times.
Water
How often
Once transplants are watered in, they can be left unwatered for much of the time unless it’s exceptionally dry. Once you notice the central leaves folding over an initiating curd, give water every two to three days if it’s dry.
At Homeacres, it’s rare that I water cauliflowers. The main time they need water is in late spring to early summer, if the weather is dry, as the first plantings grow large and then mature.
How much
Cauliflowers grow best in temperate climates with steady moisture. If your climate is dry, and perhaps hot as well, you may struggle to grow them unless you can provide a lot of water.
Extra mulch to retain moisture?
Worthwhile only in very dry climates.
Leaf removal
As the plants grow, their lowest leaves start to yellow and look diseased. This is normal. Remove them by pushing downward on their stems, at the same time as twisting them off.
Old leaves can go on the compost heap. This reduces slug numbers and allows you to spot and pull any weeds.
Harvest times and methods
How to judge readiness
When plants are large, check every few days for the first signs of a curd forming. Once you see a baby curd, hopefully with lots of healthy small leaves still wrapped tightly around it, you can expect a large cauliflower within about one week, depending on the level of warmth. In a cool spring, and for Romanescos in early winter, this could take a month.

How to pick
Use a sharp and solid knife to cut through the main stem, as well as a few leaves. The leaves are edible and tasty, as with broccoli leaves. It’s another advantage of growing your own, the bonus of more to eat from one planting.
When to pick and how often
Unlike broccoli, cauliflower curds are a single harvest, followed by no, or very little regrowth of any new curds. Romanesco sometimes makes secondary curds, but they are small and rarely worth waiting for in my experience. Secondary growths on widely spaced plants is not efficient, in terms of harvest weight per area.
- Summer cauliflowers can quickly open into seeding florets, with some decay and off colours, all within a few days of them having been a beautiful cauliflower. Don’t wait too long in summer before cutting your glittering prize.
Cauliflowers in autumn and spring will stand in good condition for longer, especially in spring when there are fewer insects to eat them. Likewise, when Romanesco are maturing in late autumn, or even early winter, they stand for up to a month because they are maturing so slowly.
Storing
At temperatures below 10 °C/50 °F, cauliflowers may store for up to a week. If they were very mature when you cut them, they are best eaten within two to three days, because some fungal decay and discolouring is probably already happening.
Saving seed
As for cabbage, I suggest leaving this to professionals, because of the space, time and expertise needed. See Real Seeds website for more information.
Potential problems
Which pests are likely, and when
As for cabbage, plants are susceptible to pigeons, rabbits and several insects. Most protection from insects is needed in summer months.
There is nothing worse than caterpillars in otherwise lovely cauliflowers, likely from midsummer and through autumn.


Protections needed
Use a cover of fleece for early plantings to give warmth, and cooler mesh for later plantings to protect from insects. If using mesh on spring plantings, use the finest grade in order to reduce damage from flea beetles, which are worse in that season compared to summer and autumn.
- Fleece can even sit directly on transplants, while mesh is usually heavier and is better supported by hoops when plants are small.
- The most damage from flea beetles is to the small leaves at the centre of plants, because some plants then struggle to even grow at all, after losing their growing tips.
- When flea beetles eat leaves through a mesh cover, the damage is not too significant, hence it can work to drape mesh on top of leaves.
Keep a cover on young plants, until you feel confident that insects and pigeons are not going to eat them. This may mean a cover until maturity!
For protection from caterpillars on uncovered plants, spray Bacillus thuringiensis every 20 days.


Other likely difficulties
Clubroot
This is possible but relatively rare. Spores are most active in warm soil, with less damage to overwintered cauliflower plants.
Clubroot results in galls or swellings, on roots and lower stems. These impede the uptake of nutrients and water.
It is spread through any import of infected plants, or from infected neighbouring plants, by use of infected tools, moving infected soil and even from surface water runoff. Spores remain dormant for several years, until coming to life again on host plants.
- You may discover resistant varieties for sale – worth a try but no guarantee. Clapton F1 is sold as ‘clubroot resistant’.
- Clubroot thrives in slightly acid and wet soils, while no dig reduces the incidence. Worth spreading a little lime in spring every year to lessen the damage.
Non-heading of summer-sown cauliflowers
Caulliflowers which you expect to head in the autumn but do not, suggest that in the following year you need to sow two to three weeks earlier.
And finally
Clear
Simply twist each stem firmly, to remove it with a few large roots, leaving the rest in the bed. In dry weather, I find it’s worth walking on the bed after any such removal, when it has caused unwanted loosening of soil.


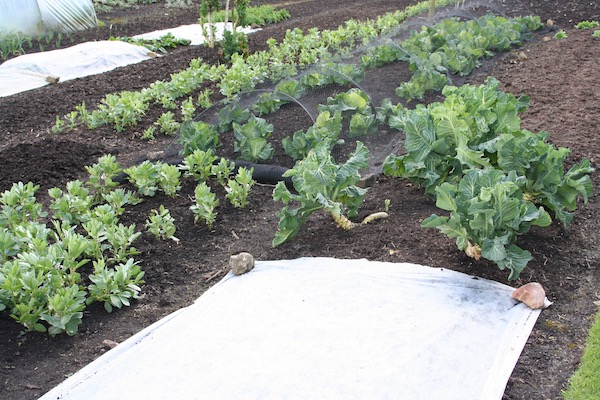
Follow with
Usually one clears ground completely before the next planting. See the photo above showing how we experimented with planting leeks between cauliflowers. This did work, although the leeks struggled for their first month until we cleared the cauliflower plants, and they took time to grow strongly.
Summer harvests can be followed by French beans, salad onions, chard, beetroot and many salads.
------
Kohlrabi
Brassica oleracea, Gongylodes Group
I apologise, to German readers especially, for giving kohlrabi a small, but sweet, mention. It's an amazing vegetable, with the swelling of its stem just above soil level being the part that we value and eat. It is sometimes mistakenly considered a root vegetable.
Kohlrabi is of the Brassica family, and susceptible to the same pests. It is strictly an annual, often maturing in half a year, and keen to flower in springtime, according to variety.
Kohlrabi is sometimes compared to turnip. This is totally unfair because the flavour is way more agreeable, the texture is firmer, and it's tasty both cooked and in salad. The main thing to beware of is woodiness, which happens only in early summer, the time when flowering initiates.
Harvests in temperate climates are best either before midsummer, from sowing very early, or in late autumn through winter from summer sowings.
- The first, early sowing date can provide about six weeks of harvest before midsummer.
- Summer sowings can give six months of harvest, plus the possibility of storage in autumn and winter.
- Kohlrabi are beautiful plants, floating their swelling stems above the ground.


Raise plants as for cauliflower, and transplant at 30 cm/12 in.
Pests are the same as for cauliflower. A fleece cover helps spring plantings to grow in warmth, and keeps off many insects. Summer plantings benefit from a mesh cover for their first month.


%20with%20veg%20to%20store.jpeg)
Kohlrabi are frost-hardy, although I don't know the lowest temperature possible. Mine have survived to -6 °C/21 °F, the coldest it usually gets here in winter. I leave them in the garden, but they also store well in a crate, from harvesting in early winter.
- A problem can be splitting across the top, which is maddening in a first sowing when a proportion of the fine kohlrabi suddenly open up. There is still an edible harvest, just less of it, and this seems to follow periods of uneven soil moisture. Keep them well-watered in spring.


