Chard & Leaf Beet
Beta vulgaris subsp. vulgaris; Leaf beet – Cicia Group; Chard – Flavescens Group
The word ‘chard’ derives from the French ‘carde’, itself a derivative of cardoon, the taller version of globe artichokes.

Introduction
The word ‘chard’ derives from the French ‘carde’, itself a derivative of cardoon, the taller version of globe artichokes. Cardoon and artichoke are in the thistle family, but there is no relationship to chard! Nor is there any ancestry of ‘Swiss chard’ in Switzerland, since its origins are coastal, from sea beet.
Chard and leaf beet are in the same subfamily as beetroot, of Betoideae. Their colloquial names can be confusing, such as ‘perpetual spinach’ for leaf beet, which bears a small resemblance to spinach. They are biennial plants, not perennial. And ‘spinach beet’ is half accurate because the flavour is less sweet than spinach, less tasty raw, and the stalks are more substantial and fibrous.
- At Homeacres I grow almost entirely chard, rather than leaf beet. My customers love the colour of the rainbow chard stalks, and the leaves’ glossiness.
- Chard’s main harvest season, summer to late autumn, very nicely complements the season of true spinach, which harvests from autumn to late spring.
- In this lesson, I only use the word chard, as being synonymous with leaf beet. To grow leaf beet you follow these same methods of sowing, transplanting and harvest. The main difference is that leaf beet, or ‘perpetual spinach’, has green stalks.
Harvest period
- Days from seed to first harvest: 50–60


Why grow them
Two very strong points are the longevity of production and the weight of harvest. I’m always amazed at how much chard we harvest from not a huge area, and over such a long period.
The flavour is not as amazing as spinach, in my view. There is a metallic edge, perhaps from the high iron content. You can eat chard raw as well as cooked.
In 2007, at the behest of the RHS, I provided the leaves for a tasting of salads with Raymond Blanc at his Oxfordshire hotel. When we got to tasting the raw chard he was unimpressed, and spat out the words ‘Zat is chard!’ Cooking it is worthwhile.
Suitable for containers/shade?
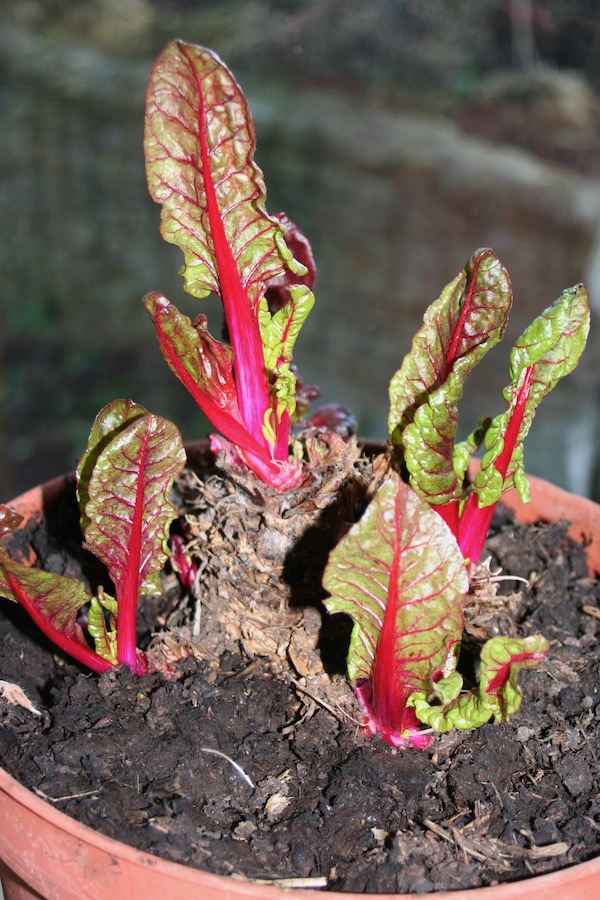
Chard can grow in the shade and is very suitable for containers, as you can see from the photos below. They were a winter season extension, using the main root of a few chard plants in late autumn, which I dug out before frosts were too severe.
The root system is large so you need a container of decent size, filled with any compost – in the photos below I used homemade, for these old roots.
- One new planting in late spring can give you food over many months from the same container. If the compost is nutritious – pure compost and no vermiculite or peat – you should not need to feed much, if at all.


Varieties
The main variation between varieties is stalk colour. Often growth and flavour are quite similar, but you have a very different looking plant and harvest.
A common white chard is Fordhook Giant. White chard gives the largest harvest because white and green leaves photosynthesise more rapidly than those with some red colour.
Lucullus is a green chard, bred for dry conditions in Australia and resistant to bolting in extreme heat. The stalks are pale green and less fat than most chards – this variety is the closest to true spinach. Erbette is similar, with a paler green colour.


Rainbow chard, or Bright Lights, is not a variety, but a selection by seed suppliers of several varieties of different colours.
Names of chard usually describe the stalk colour, for example, Ruby chard, Yellow chard, Red chard.
Some selections of rainbow chard grow gorgeous stalk colours, from crimson to orange to pink. In this regard, I have particularly enjoyed the chard from Bingenheimer seeds in Germany.
Video
Chard – so productive, after difficult starts
Sow and propagate
Seeds are medium-sized and clustered, so growth is reasonably fast and prolific.
Propagation works best under cover because, as with beetroot, there are many pests that enjoy the tiny seedlings. These include slugs, woodlice, and sparrows.
- Seeds germinate in five to seven days.
Sowing time
A key understanding is that chard flowers in early spring. Therefore, if you sow in late winter to early spring, there is a risk of your early growth converting to flower stems before the plants are very old.
- Early spring sowings are likely to produce a fair few bolting stems, compared to sowing in mid-spring which results in only a few. With multisown clumps, it’s simple to twist out the bolting plants and leave the rest to grow more.
- The presence of even a few bolters makes a planting look far worse than it really is – there will still be many good plants producing.
- The most productive sowing time is mid-spring, from which harvests can flow all year and even through winter a little.
It can also be worth sowing in early summer to give autumn harvests a boost. Another nice result is that the younger plants will better survive winter, compared to the older plants of your first sowing.


Sowing method
Chard seeds are mostly in clusters, just like beetroot. Each seed grows perhaps three seedlings of variable vigour – multisow according to how many plants you want. Because of uncertain germination rates (never 100%), I treat each seed as though it will grow one plant.
- Sow three seeds if you want three plants, and then remove the weakest seedlings.
- For chard to cook with, aim for two plants per clump. This should give plenty of medium-sized leaves, rather than fewer large leaves from one plant per module.
- For chard to grow salad leaves, four seedlings in a clump works well, so that none are too big.
- When thinning seedlings, and if they are rainbow chard, you can pull out the stem colours that you like the least. Do this as soon as the cotyledons are developed. The colour of each plant shows early in life as the colour of its tiny stems.
Pot on?
There is rarely any need to pot on. It’s easier to time your sowings at less than a month before the ground will be ready, and just three weeks in summer. Sometimes we even transplant two-week-old seedlings, when conditions are favourable.


Transplant/interplant
Transplant size
Two true leaves is a minimum, and plants can be larger than that, up to, say, 8 cm/3 in high.


Transplant time and method
For growing outdoors, the transplant time is late spring to midsummer, possibly late summer in warm climates. For growing chard under cover in winter, sow and transplant in early autumn.
Holes that you make with a wooden dibber need to be quite deep because chard transplants often have long stems, which become stable when below ground level.


Spacing
For salad chard, plants can be as little as 22 cm/9 in apart.
For cooking chard, spacing can still be quite close, from 30–35 cm/12–14in. Slightly wider spacings are good for long-term growth so that each clump has room to continue exploring for food and moisture.
Interplant
Chard is quick to harvest when plants are close together in a block. Occasionally you may have the chance to pop plants in spare space, as we did with a second-year asparagus planting that was not yet rooting into the whole bed. Don’t overcrowd the asparagus though.


Transplant size
Two true leaves is a minimum, and plants can be larger than that, up to, say, 8 cm/3 in high.
Transplant time and method
For growing outdoors, the transplant time is late spring to midsummer, possibly late summer in warm climates. For growing chard under cover in winter, sow and transplant in early autumn.
Holes that you make with a wooden dibber need to be quite deep because chard transplants often have long stems, which become stable when below ground level.
Spacing
For salad chard, plants can be as little as 22 cm/9 in apart.
For cooking chard, spacing can still be quite close, from 30–35 cm/12–14in. Slightly wider spacings are good for long-term growth so that each clump has room to continue exploring for food and moisture.
Interplant
Chard is quick to harvest when plants are close together in a block. Occasionally you may have the chance to pop plants in spare space, as we did with a second-year asparagus planting that was not yet rooting into the whole bed. Don’t overcrowd the asparagus though.
Water
How often
As with all leaf vegetables, chard produces the most when it is well watered and when soil is at optimum moisture. The no dig method helps a lot because both drainage and aeration are automatically good, making it more difficult to over-water in particular.
- In dry conditions, it should be fine to water twice a week.
- If you don’t water, plants will most likely survive but give smaller harvests.
How much
It’s worth giving a serious amount of water each time you apply some. Then it can descend to the deeper roots, and last for longer with less evaporation.
A dry surface does not mean you need to water, because many roots go down deep to find moisture.
Extra mulch to retain moisture?
This is definitely a good idea in dry climates. Not only will it increase leaf growth, but it should enable plants to live longer from being less stressed.
Leaf removal
This is all in the picking. Have two buckets or containers each time you harvest a few leaves and always take the opportunity, while you are there, to remove decaying and damaged leaves.
- This reduces interest and habitat for slugs.
- It keeps plants looking nice, always a strong point for any garden, and for you.
- The next pick will be easier and quicker because there won’t be as many decaying leaves in the way of your picking of good ones.
Harvest times and methods
How to judge readiness
You can pick leaves a soon as you see any of the size that you like. However, do balance this with three considerations:
- Before a first pick, wait until leaves are touching each other, between neighbouring plants. This allows a decent root system to have established. Regrowth will then be stronger.
- The first pick from small, young plants needs doing carefully, in order not to damage the root system which is still developing.
- In the dark and cool of winter, all leaves are small. Don’t wait for them to grow more – they won’t! Just pick small.


How to pick
With a gentle twist, leaf stalks generally detach from the main stem at soil level. This gives more harvest and leaves very little stalk on the plant, which makes the next picking easier. It also reduces slug habitat, in the crevice between the centre of a plant and a decaying residue of any stalk.
- For each leaf you want to pick, place your thumb at the base of its stalk, near to soil level and with fingers below the stalk. Push downwards and at the same time rotate slightly, to enable a clean break.
- You can use a knife to cut stalks as low as possible, but this will leave a decaying residue.
- For salad chard, you can perhaps use your thumbnail to ‘cut’ each stalk, close to the main stem.
Cutting whole plants
This is an option, being sure to cut above the level of central young leaves. The cut is quick, but regrowth will be much slower than when you pick leaf by leaf.
When to pick and how often
You could harvest chard three times a week in the summer, from a few plants. Say six to eight clumps for a family. Chard’s speed of growth during the five months from late spring to early autumn is remarkable, as long as there is soil moisture.
If plants produce more leaves than you need, some will start to decay, grow tough or develop spots as they age. It’s worth picking these leaves to put on the compost heap, allowing new and more tender growth.


Storing
Of leaf vegetables, chard is one that stores the best, thanks to high dry matter in each leaf and stalk. They go limp if not in a polythene bag, and you can also keep them fresh by placing the bottoms of stalks in some water.
In a polythene bag in cool temperatures, chard can store in nice condition for up to ten days.
Saving seed
As for beetroot, this is not worthwhile in a small garden, since it requires space for six to eight plants which grow very large.
And finally
Which pests are likely
- Slugs eat holes in leaves.
- Birds peck leaf edges between the veins, leaving a jagged pattern.
- Deer eat the leafy top of any stalk, and prefer red to green.
- Leaf miner hoovers up inside leaves, between the two outer layers, causing limpness and brown patches which can be large.


Protections needed
Leaf miner is the only problem insect. However, when soil is fertile, no dig and moist, it should not be significant enough to worry about.
One method of protection is bird netting. I recommend UV treated, polypropylene net with 12 mm/0.5 in squares. You should be able to reuse it for at least ten years and probably more. Best width of netting is twice the width of your beds, so there is enough width for the plants’ height on both sides.
- Wind and cold may slow growth, especially of seedlings in spring. Lay fleece directly on top of new plantings, or use mesh on hoops when they are larger.


Other likely difficulties
Some plants suffer mould on their baby leaves, like a downy mildew. It affects only a few plants and, in a bed with close spacing, there are sufficient healthy plants for harvests to continue.
And finally
Clear
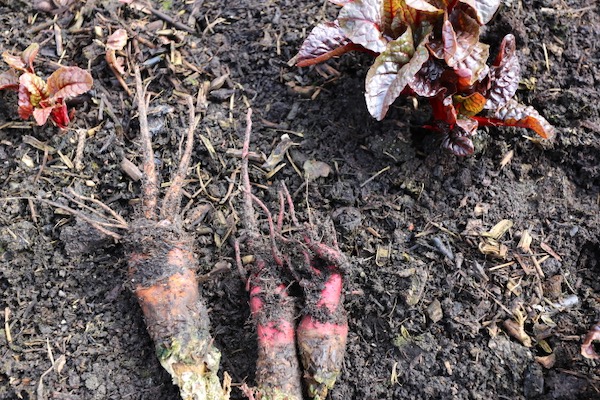
The roots of chard are like thin, long and fibrous beetroot. The main part of them is below ground level and needs removing once you see flower stems in the second spring. Beyond that stage of maturity they would, if left in the ground, continue to grow flowering stems rather than leaf stalks.
Sometimes to clear you can twist them out, if there is enough main root above ground that you can get your hands around it. Otherwise use a sharp trowel, and cut deep enough into the main stem – say 10 cm/4 in – that it does not grow again.


Follow with
Chard finishes mostly in early to mid-spring, so you have a blank canvas for almost any planting in the following year.
You can speed up ground preparation for any following vegetables by mulching before spring.
- Spread 2–3 cm/1 in of compost between and around chard plants during late autumn or winter, once their leaves are small enough to allow space for applying the compost. Chard continues to crop until spring, then you can remove plants, rake level and your bed is ready for new plantings throughout the coming year.

