Peas
Pea – Pisum sativum, Sweet pea – Lathyrum odoratus

Introduction
Sweet green peas are a modern development. Dried peas were the valued part of older diets, especially for how well they stored, making them a fallback in times of famine – see the Carlin pea variety below. Productive plants for peas are perhaps 6000 years old, from the Mediterranean region.
Peas are in the legume Fabaceae family, along with all the beans we grow, lentils and peanuts. The roots of most legume plants form a symbiotic relationship with certain rhizobia bacteria in soil, which convert atmospheric nitrogen to ammonia, thence to nitrates, resulting in more growth. The nitrates are in pink clusters or nodules, on the roots of legumes that are growing strongly.
- However most nodules are used by the plants themselves, and as few as 3% remain once pods are picked and leaves are yellowing.
Fresh pods of green, sweet peas provide fewer calories than dried peas and are a luxury food for a brief time of year. They were bred first in Holland, then later in gardens of the British aristocracy. They spread to North America, where green peas are called ‘English peas’.

Since the 1950s, there has been much breeding of new varieties for growing green peas in large fields. They all ripen at the same time, enabling mechanical harvesting, followed by immediate freezing to conserve the sugars.
- As a result, green peas have morphed into a relatively cheap, convenient and staple vegetable.
- This is compared to when the work is done manually in gardens, where the output per hour is far lower, although for a highly desirable result.
- Homegrown peas are one of the luxury pinnacles of home gardening. They require an investment of time for growing, supporting, picking, shelling and clearing.
- Mangetout peas with edible pods increase the harvest and decrease preparation time.
- Pea shoots are great options for extending the season of pea flavours.


Sweet peas are also Fabaceae but in a different genus – Lathyrus. Perennial sweet peas are Lathyrus latifolius.

Harvest period
- Shoots are the growing tips of plants, with many picks possible from each sowing and earlier in the season than pea pods. Days from seed to first harvest: 35–50.
- Pods, days from seed to first harvest: 90–110, depending on the type of pod, the height of the plant, and how full you like the pods.


- Best climate is mild and temperate, with summer not too hot and dry.
Why grow them
Flavour, tenderness, sweetness and bright colour. There are plenty of reasons to grow your own, especially the extra sweetness and flavour. They taste so much better than most commercial garden peas.
Pea shoots make an early green harvest, while for pods you have many types and plant sizes to choose from. Not to mention the joy of picking and eating a few peas and pods while in the garden.


Pattern of growth
Peas are hardy annuals, so they resist frost and complete their life cycle within a year or less. Only if you sow just before winter, to overwinter as small plants, do they survive into a second year.
Most new growth happens in spring when leaves are super healthy. The strongest flowering happens in late spring, and the best podding in early summer. All of which points to sowing in very early spring, to catch that season of health and abundance.
Another advantage of early sowing is that, if you want to save seed, there is enough fine weather before the dampness of autumn for pods and seeds to dry on the plants.
- See below for one variety that is good for out of season, summer sowing.
Two harvests
As well as pea pods, you can harvest plant shoots – tender stems with pea flavour. Some have edible tendrils too, if you use marrowfat peas as the seed, and any variety can work for shoots.
If you want to keep picking shoots from one sowing, for six to eight weeks in springtime, I suggest a planting area for shoots only, as in the photos below, and a different area for pods.


Suitable for containers/shade?
Look for varieties described as ‘dwarf’, suitable for containers. Sweet Sahara is one, which I am growing in 2021.
Peas can grow in the shade, just less exuberantly unless summers are hot. In hot climates, I recommend some shade because the fast rate of growth means that roots need a lot of water.


Types
There is a First and Second Early categorisation, which was more highlighted in gardening when pea pods were the prized harvest. Also perhaps when fleece covers and cloches were not available, meaning that early crops had more value.
- First Early types are round-seeded and more cold hardy: you can sow them in November, although that never worked for me. Dwarf varieties, such as Meteor and Feltham First, can crop by late spring.
- Second Early types grow wrinkled seeds, and are all the varieties listed below. I have separated them according to eventual height and the type of pod they grow.
Wrinkled peas have more sugar, from not having an enzyme called SBEI. They can hold more water when fresh, making the skins wrinkle as they dry. Most garden peas we eat are wrinkled seed types, with high sugar content.
- Gregor Mendel preferred the sweetness of wrinkled peas, and their difference to round ones inspired his trials of the 1860s, resulting in his laws of genetic inheritance.
Round peas are the dominant shape genetically, with more starch, and they hold less water when fresh. They are grown more for animal food, and as dry pulses to eat.
Varieties
There are hundreds of pea varieties, with a huge range of characteristics. My list below is short but sweet, to give you an idea of what to look for
- A note on heights – if your soil is fertile and the weather favourable, plants may grow taller than advertised. And vice versa in poor conditions.
Podding peas are for shelling, usually green and sweet.
Dwarf to medium height
- Kelvedon Wonder, 45–50 cm/18–24 in, is a heavy cropper, quite early.
- Hurst Greenshaft, 60–75 cm/24–30 in, is esteemed for fine flavour.
- Starlight, 75–105 cm/30–42 in, has small and very full pods over a long period; the peas are not the sweetest, but are dense and filling.
- Terrain, 90–105cm/36–42 in, crops both in summer and autumn, thanks to its mildew resistance.


Tall
- Alderman, 2 m/6.5 ft, grows large pods with peas of excellent flavour.


Snap peas have edible pods and sweet peas inside; they are fatter plus sweeter compared to mangetout – see below. Sometimes called sugar snaps.
Dwarf to medium height
- Sugar Ann, 24 cm/60 in, can be grown without supports, produces decent harvests from compact plants and is harder to pick than taller peas.
- Cascadia, 75–90 cm/30–36 in, gives many nicely filled pods and is easy to manage.


Tall
- Tall Sugar, 2 m/6.5 ft, has been a favourite since I first grew it in 1998, and I have kept seed since – sweet, full pods.
Mangetout are picked before peas swell because by that stage their pods have sinews. Also called snow peas and Chinese peas.
- Oregon Sugar Pod, 1.2–1.5 m/4–5 ft, is highly productive and has sweet pods when they are picked young.
- Golden Sweet, up to 1.8 m/6 ft, grows lovely yellow pods and is productive too.


Pulse/soup peas are round not wrinkled, best harvested dry and stored like any dry pulse.
- Carlin is an old English variety, and could support its o.9 m/3 ft height if grown in a block – see the photos below.


Video
Peas on 23rd June 2019 – varieties and supports, the many different ones
Sow and propagate
You don’t need to soak pea seeds before sowing, but it’s an option! I don’t because it’s one less job. Seeds swell quickly when in moist compost and soil.
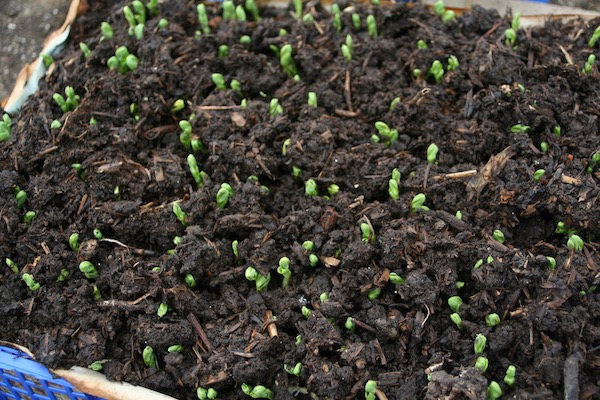
- Seeds germinate in six to ten days.


Sowing time
The standout time to sow is from late winter to early spring under cover, and early spring outside. This allows your plants to capture their natural, healthy time for growing a lot before flowering. Later sowing risks mildew and perhaps pea moths too, resulting in smaller harvests.
I find best results from sowing under cover, in warm weather as much as cool.


Sowing method
Direct
If you sow outside, draw a drill 5 cm/2 in deep from ridge to furrow and drop pea seeds in it. If soil is dry, water the bottom of the drill before sowing. Space according to variety and desired harvest.
Problems are more likely with direct sowing, compared to modules under cover.
- Mice eating seeds is a big issue.
- Birds may pull out the first tiny leaves, in order to eat the sprouted seeds.
- In dry weather, moisture is more difficult to maintain during germination, compared to when module sowing.
Modules
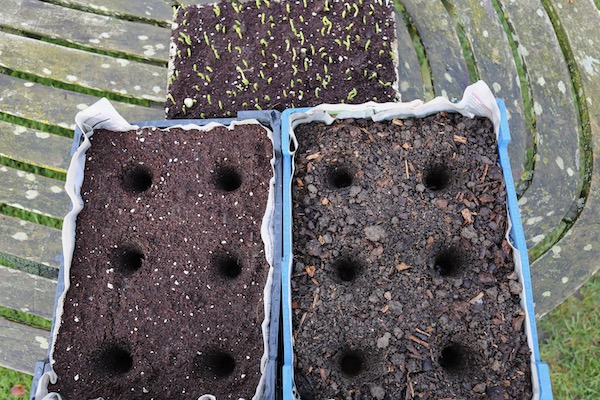
Modules for peas can be any size, from 3–5cm/1.2–2 in diameter and depth. The aim is not to set out large plants, but to have them securely growing and underway. You can sow, transplant and grow pea plants in clumps.
- For pea shoots, sow any number from three to five seeds in a cell.
- For pea pods, sow two to three seeds. Compared to peas for shoots, the plants grow larger and for longer, needing more space.
When filling modules, firm the compost less than usual and pop pea seeds in the middle of each cell. For each clump of seeds, there is no need to space them out. Push down on seeds and compost to make the compost firm, with pea seeds below surface level. Then fill with more compost, even heap it up a little to gain volume.
Now water a few times, to ensure 100% moisture level in all modules.


Video
How to grow peas, with emphasis on early sowing
Transplant
Transplant size and time
Once peas are two to three weeks old, still quite small, they are better in the ground. You should not need to pot them on.
The weather may still be cold, even frosty. Pea plants resist frost, but fleece covers mitigate the cold and give shelter from wind. In addition, they protect pea seedlings from birds and rabbits, although not rodents sadly.
Hardening off
This is the name used for adapting plants to different conditions. How necessary is it for pea plants raised under cover?
This partly depends on what ‘under cover’ means.
- If your peas have been under lights in a warm house and are going into a cold garden, I would take out the plant trays during the daytime, for two days before planting.
- From a cold greenhouse on the other hand, which is closer to natural conditions and light, I find that no hardening off is necessary, as long as transplants are covered straightaway with fleece.


Transplant method
To check the supposed need for hardening off, I took module-raised pea plants off the top of my hotbed, where their rootballs were at least 25 °C/77 °F, and put them straight into soil at 7 °C/45 °F. This was outside in March, early spring. It was a big temperature difference, but I laid fleece on top and they grew fine.
Set transplants into reasonably deep holes, not filled in, leaving the pea stems a little below soil level.
This gives added wind protection, even under fleece, and if it snows, plants suffer little damage from any weight of snow because they protrude less above ground level – see the photos above.
Spacing
You have options, according to the type of pea and desired harvest.
- 22 cm/9 in equidistant for shoots is straightforward, similar to almost all plants for salad. They need no support.
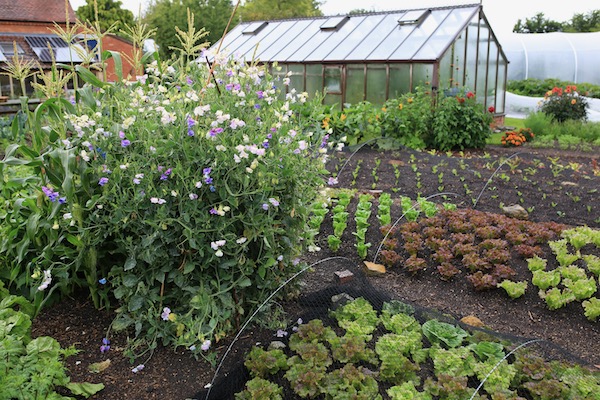
For peas you support, double rows use space more fully – a row on either side of the line of supports. For a bed of 1.2 m/4 ft width, the double row along it works well for ease of picking. Even though it looks wide at first, plant roots fill that soil space and leaves spread out above. Space transplants at 15 cm/6 in along each row.
- Or run the double row and its supports across a bed of any width, as in the photos below. Allow 37–45 cm/15–18 in of space to the next row of vegetables either side.


Interplant peas for shoots
This is possible, mainly between other salad plants since they are picked small as well. No plant overpowers another at first, or until a little later!
My experience of this is mostly under cover, through winter. You can translate it to outdoors in spring.


Support
The videos should give the most help on this.
There is no one solution, everyone has a preferred option and that is excellent.
- A YouTube viewer said he loved my method of string supports, until pigeons worked out how to sit on them and eat the pea leaves.
- Pea tendrils cling strongly to any twigs or netting, so branches with twigs are good. However, with netting especially, it needs a while to disentangle all the tendrils after final harvest.
- Check the description of any variety you grow, to know how high your supports should be.


Transplant size and time
Once peas are two to three weeks old, still quite small, they are better in the ground. You should not need to pot them on.
The weather may still be cold, even frosty. Pea plants resist frost, but fleece covers mitigate the cold and give shelter from wind. In addition, they protect pea seedlings from birds and rabbits, although not rodents sadly.
Hardening off
This is the name used for adapting plants to different conditions. How necessary is it for pea plants raised under cover?
This partly depends on what ‘under cover’ means.
- If your peas have been under lights in a warm house and are going into a cold garden, I would take out the plant trays during the daytime, for two days before planting.
- From a cold greenhouse on the other hand, which is closer to natural conditions and light, I find that no hardening off is necessary, as long as transplants are covered straightaway with fleece.
Transplant method
To check the supposed need for hardening off, I took module-raised pea plants off the top of my hotbed, where their rootballs were at least 25 °C/77 °F, and put them straight into soil at 7 °C/45 °F. This was outside in March, early spring. It was a big temperature difference, but I laid fleece on top and they grew fine.
Set transplants into reasonably deep holes, not filled in, leaving the pea stems a little below soil level.
This gives added wind protection, even under fleece, and if it snows, plants suffer little damage from any weight of snow because they protrude less above ground level – see the photos above.
Spacing
You have options, according to the type of pea and desired harvest.
- 22 cm/9 in equidistant for shoots is straightforward, similar to almost all plants for salad. They need no support.
For peas you support, double rows use space more fully – a row on either side of the line of supports. For a bed of 1.2 m/4 ft width, the double row along it works well for ease of picking. Even though it looks wide at first, plant roots fill that soil space and leaves spread out above. Space transplants at 15 cm/6 in along each row.
- Or run the double row and its supports across a bed of any width, as in the photos below. Allow 37–45 cm/15–18 in of space to the next row of vegetables either side.
Interplant peas for shoots
This is possible, mainly between other salad plants since they are picked small as well. No plant overpowers another at first, or until a little later!
My experience of this is mostly under cover, through winter. You can translate it to outdoors in spring.
Support
The videos should give the most help on this.
There is no one solution, everyone has a preferred option and that is excellent.
- A YouTube viewer said he loved my method of string supports, until pigeons worked out how to sit on them and eat the pea leaves.
- Pea tendrils cling strongly to any twigs or netting, so branches with twigs are good. However, with netting especially, it needs a while to disentangle all the tendrils after final harvest.
- Check the description of any variety you grow, to know how high your supports should be.
Water
Tall peas need more water than dwarf peas. Their growth is like a thick hedge in your garden, for a month or so, with masses of leaves all transpiring moisture.
- When you first see flowers on plants for pods, it’s important to water them if the weather is dry.
- From this stage, water two or three times a week, a good amount.
- Even in damp weather, pea plants’ speed of growth through early summer can make watering worthwhile.
- Peas for shoots need moisture to keep producing. If plants are stressed by dry roots, they grow fewer shoots and more flowers. Their picking season may be curtailed.


Extra mulch to retain moisture?
This is worthwhile in dry climates, less so in moist ones. Peas are not in the ground for more than half a season.
If you plan to follow peas with slug-sensitive plants like chard and salads, any undecomposed mulch can reduce growth of subsequent plantings.
Prune
None needed!!
Harvest times and methods
I have created two sections here, for shoots and pods.
Shoots


How to judge readiness
First shoots may be ready in cool spring weather, when plants are less than 30 cm/12 in tall.
- The question is, what is a shoot?
Each person picks them differently, at any length, as long as the stem is tender. For tall varieties, the shoots are longer and bulkier.
Sometimes shoots have tendrils and these are edible, but you may not like them! Just occasionally, shoots will have flowers. This is normally a bad sign for shoots because the stems are now thinner and more fibrous, and flower stalks are also chewy. If there are many flowers, final harvest is close, before removing plants. Unless you leave them for a (small) harvest of pods.


How to pick
Pinch the tender stems between your finger and thumb, or use a knife if you wish. It’s a quick job and the harvest is not heavy.
After your first pick of the main leader, there may be new shoots within a few days if temperatures are high, say 21 °C/70 °F, or within a week if it’s cool, say 12 °C/54° F by day. New shoots appear from the plant base and at all levels, so look closely, including under leaves, for new shoots.
When to pick and how often
By early summer, harvests are frequent and more substantial. The main period of harvest quantity is June or early summer, and then it tails off rapidly by solstice, as plants switch from growing to flowering.
Early morning is a lovely time to pick shoots, at a time of year when birds are singing and there is the gorgeous dew of spring. Shoots gathered in the cool of morning will store for longer, in a plastic bag to retain moisture.


Pods
How to judge readiness
For mangetout, pods need to be thin, with just a slight swelling along the line of baby peas inside. If allowed to grow fat, the pods are not mangetout any more. They become stringy and peas need to be shelled out, though it is still an excellent harvest.
For snap peas, the sweetest result is when pods are reasonably fat. You can also pick them half empty, for tasty pods with less sweetness. The sweetness comes from the swollen peas, before they turn firm and starchy.
For peas to shell, pods need to look reasonably round and feel firm. However don’t wait too long, otherwise peas become more dry, dense and less sweet.
- Or allow this extra maturity, when leaves change from green to yellow, if you want a harvest of dry peas to store.


How to pick
Search among your plants for pods that are ready. Generally, the first ones swell near ground level, but not exclusively. Pods may be hidden behind leaves, so look carefully to find all the ready ones.
To detach pods from plant stems, pull sharply and firmly, with the other hand holding plants to prevent stem breakage. Each pod, or pair of pods – they often hang in two’s – are best with their stalks attached after picking, so that pods are undamaged and peas stay fresher.
When to pick and how often
First pickings feel rare and precious. Then, within ten days, you can pick every two to three days and the amount increases. Pick frequently in warm weather – the table below shows how harvests get heavier each week, from there being more pods, and also thanks to higher pod weight as peas swell.
The table shows harvests from Podding Pea Starlight – module-sown on 17th February (seven plants across the 1.5 m/5 ft bed), transplanted on 13th March and staked in mid-April.

Another yield figure is from Oregon Sugar Pod, in a bed of 1.5 x 7m/5 x 23ft – see the photo gallery below.
- The first pick, mid-June, gave 2 kg/4.4 lb of mangetout pods, then more picks every two to three days.
- By the end of June, there were no thin pods and we were picking pods for shelling.
- The final pick on 5th July gave 9.1 kg/20.1 lb of delicious shelling peas, and pods for making wine.


Storing
Pea shoots are full of moisture and peas in pods are full of sugars. Neither store well and are best enjoyed within two days at the most.
Saving seed
Peas are perhaps the easiest vegetable to save seed from, for two reasons:
- They do not cross-pollinate between varieties. You need only one plant of any one variety to save seed that will grow true. Or you could grow two varieties near to each other, and seed from both will grow true to type, with no crossing.
- Seed saving is quick and easy, because the harvest of pea seeds happens soon after the harvest of green peas to eat. Allow three to four weeks after a final pick of pods for green peas, depending on the weather.
After picking the dry, or almost dry pods, shell their peas and leaves somewhere dry and warm, to ensure full dryness before packaging in envelopes or Tupperware.


Potential problems
Pests


Pea moths (Cydia nigricana)
They fly from early summer, causing most damage after the summer solstice.
I know of no remedy except to sow early, for harvests to finish before moths are numerous.
Often you don’t know that caterpillars are there, until you find eaten peas when shelling.
The moths lay eggs on stems, then young caterpillars enter pods from above and spend up to three weeks inside, eating and excreting.
Weevils of pea and bean (Sitona lineatus)
Visible damage can be seen in serrations around the edges of young leaves in late spring to early summer, while invisible damage is through roots being eaten by the larvae, from mid-spring. Usually the harm is mainly cosmetic, especially in fertile and moist soil.
- Transplanting in early spring sees plants establish before the pests do, meaning that plants then have tougher leaves by the time there are adults hatching. Some leaves will be notched, but growth should continue fine in healthy and well-fed soil.
- This is a similar principle to avoiding blackfly damage on broad beans, whose leaves (not pods!) are tougher from early sowings.
Disease


Pea powdery mildew (Erisiphe pisi)
The lower leaves of plants begin to show signs of mildew in early summer, especially in dry weather. Therefore one remedy is to keep plants well-watered.
- However, powdery mildew on pea leaves is totally normal from midsummer and is best reduced by sowing early in spring, say March rather than April. This means you harvest before mildew is too developed.
In contrast, the sowings of late spring will be ripening in midsummer, often with some leaf mildew, and the result is peas not being sweet. Mildew prevents leaves from photosynthesising to produce sugars.
- You can sow mildew-resistant Terrain in spring if worried about mildew, as well as sowing it in early summer for harvests in autumn. They are less heavy than in summer, from the same number of plants.
And finally
Clear
Pea plants make a large volume of stem and leaf, excellent for the compost heap after the last harvest. The question is how to clear it from any space – a wheelbarrow is useful. We also run the rotary lawnmower over the top of any bundle of pea plants before composting, to break the stems and speed decomposition.
For a long bed, we walk on top with the lawnmower on its highest setting. This both cuts the stems and clears them into the hod, whence to the compost heap.
In arid climates, you could just cut the stems at ground level, with a knife or scythe. Leave the pea plants there, perhaps walk on them to squash down, and transplant new vegetables through the pea mulch.


Follow with
From early sowings, the options are any vegetables that grow in the second half of the year, according to your climate.
Peas for shoots often finish by solstice, and options to follow include transplanting beetroot, Savoy cabbage, broccoli, leeks, radicchio or celery.
A month before you clear podding pea plants, check my sowing timeline for ideas, and make sure to have transplants ready as soon as you clear space. See also Lesson 7, Course 3A, for an explanation of how I underplanted celeriac very close to pea plants, illustrated in this photo.


