April 2022 plant raising, how to transplant, using covers, no dig fun, compost, salads, beautiful food, NEW weekly advice
Heading

Spring is here, in its usual stop start fashion. If you still have snow, may it melt soon. Be prepared for frost in many areas, and do not rush to sow plants which need warmth. For example I sow cucumbers and courgettes in mid-April, indoors and with warmth.
It’s important to know your average last frost date at this time of year. You may need to cover potato leaves, if they have grown before your likely last frost. Here, that is usually mid-May, and my timeline + now reduced Calendar reveal some results from that.
Meanwhile there are spring flowers to enjoy. Probably some watering too: rainfall here in March was 60% average at 44mm/1.8in. We water by hand, not much yet and only to new plantings.


How to plant and space
Setting plants in the ground is a skill to learn, especially spacing them correctly. My Useful Information lesson has spacing tables, and we shall offer this for free to subscribers of our new weekly-advice email, see below.
One thing that advice on spacing finds difficult is… the distance between different vegetables. Best approach is to use the wider spacing so for example if you want to grow lettuce close to potatoes, and the potato plants on average need 45cm / 18in between them, then 45cm / 18in is the space I would allow between potatoes and lettuce. There is some flexibility in this: radish and turnips if you transplant them now, will finish before say potatoes need the space. Space has a time element. Einstein would have enjoyed growing vegetables, or perhaps he did :). And for more about spacing, this module of Skills has loads of information.
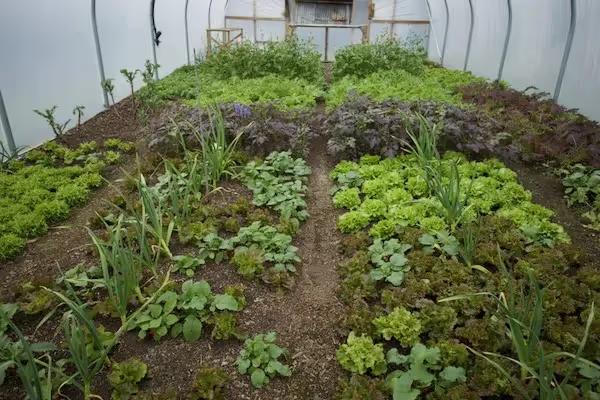
The two beds photographed below are my dig / no dig trial beds and you will see them in a video we publish this coming weekend, which is also about how I grew cover crops of mainly broad beans on these beds over winter. Growth of the bean plants looked pretty similar from December through to 10th March, but after we harvested, cleared and weighed, there was an intriguing difference! Much more than it appeared to the naked eye, and that is an interesting subject again.


Using covers in spring, on new plantings mostly
At this time of year, covers are to convert the excess of light into warmth. And at the same time they keep pests from eating your seedlings. My garden is quite white by the middle of April, when three quarters of beds are planted. Ny early May, we remove most covers, for reuse the following spring.
I’m still looking for non-plastic alternatives and find problems with natural materials. Cotton for example is less warm and five times the price of horticultural fleece. A wool cover I was sent to try it is just too heavy and dark, plus it drops bits of wool on leaves.
Do watch this video on which covers to use and when. We filmed it during last year’s cold April – I mention frost a lot. For a wider view on using covers, including through winter, see this module of my Skills course.
Often I lay covers on the plants. Fleece in particular is so light that new growth can easily push it upwards. Having it flat on the plants means that warmth is better held, close to the plants.
For heavier covers and in frost, steel hoops mage from simple lengths are good, in the UK from Sharanya. Space at 1.5m apart and lay more horizontally than the ones you see on Sharanya’s homepage, because if hoops are bent too vertical they will lose the covers in high wind.


Seedlings, and size for transplanting
There are many ways to start seedlings and if you’re a beginner, it might be worth watching this video and this one about first steps in early sowing, and then this one which explains about plants which need warmth.
I start the tiniest seeds in small trays, for eventual pricking out as tiny seedlings. The green tray could have as many as 200 celeriac seedlings, so it’s an efficient way to get a lot of seedlings underway. Then you need a decent compost, a whole subject of itself (most “multipurpose” should work), and then decide how big you want your plants to be before transplanting.
The ones below right are bigger than I normally like to plant out, because larger transplants suffer a check in growth after planting. These are big because probably surplus to requirements, but I keep spare plants for a fortnight or so in case of needing to fill gaps after pest damage.


Raising transplants
The module trays I designed are proving popular, and you can set plants in the ground from them at 3 to 4 weeks old, without needing to pot on. This saves much time, see this comment from You Tube, Chis Foster in Georgia 27th March:
“Your module trays make things SO much easier. It’s great to be able to pop smaller younger plants into the garden, for less transplant shock, and speed of growth. Yesterday, I transplanted radish and turnips from your trays that were less than 2 weeks old! The root balls were already developed and they were ready to go in the ground, from smaller cells that require less compost.”
I’m certainly finding they meet requirements for raising all transplants except those who seeds are enormous, such as broad and runner beans. You can buy all three sizes from different suppliers, according to where you are and including North America, as in my links page


In the ground, they look small, and carrots can be difficult
New transplants often look disarmingly small and vulnerable. Yet in my experience they often survive better than larger plants, because they can adapt more quickly to the new situation and start growing almost straight away, which gives strength to resist pests such as slugs. With no dig you should not have too many slugs (those ground beetles you spared by not digging will be eating slug eggs) but if you do suspect them, I would go out with a torch at dusk to see what’s crawling, and cut or remove them.
Sowing direct is another matter and I have only today seen my first miniscule carrot seedlings, from seed sown two weeks ago. Cold nights are slowing progress.


Making no dig beds
I see more and more posts now on social media of people doing this and it’s lovely that the simplicity of it is being noticed and used. You need a decent amount of compost and that can be the main restriction in terms of how much space you can take in. Do check out Woodland Horticulture in Somerset, and any local supplier. Even make a new bed for planting asparagus, if you can find crowns (plants).
For the bed of rosemary plants below I’m using old woodchip. It’s an experiment, because there may still be too much wood in it, which will be taking nitrogen away from plant roots. This can be an issue with ‘hugel’ beds which have much wood at the bottom, but many of them also have a lot of decent soil and compost above the wood, to feed growth for a year or two until the wood is decomposing.
In the new bed below, by autumn the roots of the rosemary will be into the soil below and even if the plants are weak at first, they should finish the year strongly and go on to be successful. We shall need to remove regularly the bindweed / convolvulus and probably some dandelions. See my no dig book (also in digital) and online course.


No dig fun with interplanting
Thanks to the absence of weeds with no dig, it’s considerably easier to pop in new plants almost anywhere you find space. There are no absolute rules for which plants like other plants because in my experience they all enjoy variable company.
The key factor to consider is that main growth periods should not overlap too much. For example the broad beans below are now starting to grow strongly and will soon need all the space. Therefore we shall soon remove the salad plants, which have cropped over winter.
Back in November we had transplanted the chervil, mustards and Claytonia, at the same time as sowing broad beans. The bed has been under a mesh all winter, and received the annual 3cm dose of compost before setting out the salad plants.


Removing cover crops to transplant
Most beds here are full of vegetables for most of the growing season. Then sometimes we sow or transplant a cover crop / green manure in late autumn. It’s a gamble with the weather because sometimes they hardly grow but this winter they have. And then, how do you remove the plants?
Photos below show removal of broad beans which were sown in November. We cut them just below ground level to leave roots in, including nitrogen nodules, then we transplanted beetroot on the same afternoon.
With no dig, a few larger plants are easier to remove than many small ones. You could cover the cover crop (!) with cardboard or plastic, but then you lose time while waiting for plants to die, plus slugs accumulate under such covers. If dug in, they rob soil of nitrogen initially, plus there is digging-damage.


Making compost and red worms Eisenia fetida
I have modified my new worm bed after advice from an expert, John Atack. I’m amazed how little I know about worms and how they may or may not be involved in making compost.
You can certainly make great compost without worm contributions. Or you can set up smaller heaps which get less hot, attract red worms, and don’t kill weed seeds! We are trying all of these, you see them on courses here and during the special compost-making afternoon course in June.


Spring salad harvests
Vegetable harvests now get more exciting every day Not only in terms of there being new vegetables, but also for the improving quality. Extra light and warmth means the leaves have a lustre which was not there during the winter.
We notice this when harvesting every week from the same plants, since November. In mid winter the leaves are small and matt, while now they are vibrant and shiny. The radish are a wonderful bonus – we interplanted them where a few lettuce had died from cold and mould.


Eating the vegetables
Vegetables have amazing colour and for me it’s one of the best aspects of eating them! Equally impressive is the flavour of homegrown, and an extra but invisible quality is the health-giving microbes you eat, without ever seeing them!
The photos below give an idea of what we serve at lunch on courses here, all grown at Homeacres except chickpeas. The dishes illustrate what our chef, Catherine Balaam (@catherinebalaam on IG) is working on for recipes in her book. All being well this appears at year’s end.
My favourites are in the right-hand photograph, celeriac remoulade with radish around, Swede/rutabaga chips, and Crown Prince squash roasted with a tahini sauce in the middle.


Seed saving
This is not always easy and I’ve had problems this spring from different batches of my own 2021 seeds saved at different times.
You need extra space in your garden for seeding plants. For many vegetables you need more than one plant to ensure a large pool of genes, which prevents inbreeding.
Learn more on Real Seed’s website where you can download a free booklet, and in the module about Seeds and Sowing that we are selling at a discount now.


Weekly advice NEW – subscribe monthly
We receive requests for advice in the form of weekly reminders of jobs best done during the coming few days. Everything grows better when the timing is good. So we have started a new weekly advice newsletter. It gives advice on sowing, transplanting, protecting, weeding and harvesting for the week ahead.
In the photo below is Anna, who helps me with books and website. She has never gardened before, is busy raising children, and now wants to have a go. She’s creating new no dig beds, where she’s standing in her garden. Anna will contribute to the weekly email, with a beginner’s perspective.
The ‘What, When and How’ will run for 9 months each year, from February until October, and costs £5/month. New subscribers receive a free one-week trial period, and subscribers will not be charged during the months of November, December and January. You can unsubscribe at any time but without refunds for cancellation part-way through a subscription month.
We offer this free if you are on universal credit, run a community garden or an allotment association, or garden for schools.
You can subscribe here, via Campaignzee
Or by visiting the signup box on the home page.


Get Charles's advice in his free newsletter
& 10% off your first order in our shop